
Integrating AI capabilities into applications has become increasingly prevalent, and with services like Amazon Bedrock, the process is made even more seamless. In this article, we’ll explore how to create a Spring Boot project integrated with the Bedrock API’s.
This article is structured into multiple sections to streamline the stages involved in creating a domain-based AI assistant using RAG and prompt engineering.
- Amazon Bedrock: Revolutionizing Generative AI Applications
- Developing a Spring Boot Application with Amazon Bedrock API
- Leveraging Amazon Titan with Spring Boot: A Guide to Generating Embeddings
- Navigating the Vector Database Universe with Spring Boot and MongoDB
- The Art of Prompt Engineering: Optimizing GPT Models for Enhanced Performance
Prerequisites
- Java Development Kit (JDK) installed
- Integrated Development Environment (IDE) like VS Code, IntelliJ IDEA or Eclipse
- Basic knowledge of Spring Boot and REST APIs
- Postman for testing application
- AWS account and admin access to management console to enable foundational models
Project Setup
The first step is to create a simple Spring boot Maven App using Spring Boot Initializr. Add the dependency Spring Web while generating the app. Download the project and unzip it. Then import it into your favorite IDE – VS Code, Eclipse or IntelliJ IDEA.
Install dependencies
Open pom.xml and update the dependencies section to add below dependencies.
Maven
	<dependencyManagement>
		<dependencies>
			<dependency>
				<groupId>software.amazon.awssdk</groupId>
				<artifactId>bom</artifactId>
				<version>2.21.17</version>
				<type>pom</type>
				<scope>import</scope>
			</dependency>
		</dependencies>
	</dependencyManagement>

	<dependencies>
		<dependency>
			<groupId>org.springframework.boot</groupId>
			<artifactId>spring-boot-starter-web</artifactId>
		</dependency>
		<dependency>
			<groupId>software.amazon.awssdk</groupId>
			<artifactId>bedrock</artifactId>
		</dependency>
		<dependency>
			<groupId>software.amazon.awssdk</groupId>
			<artifactId>bedrockruntime</artifactId>
		</dependency>
		<dependency>
			<groupId>org.json</groupId>
			<artifactId>json</artifactId>
			<version>20231013</version>
		</dependency>

		<dependency>
			<groupId>org.springframework.boot</groupId>
			<artifactId>spring-boot-starter-test</artifactId>
			<scope>test</scope>
		</dependency>
	</dependencies>
Configure Application
Open application.properties under “src/main/resources” and add below properties.
application.properties
#aws configration
cloud.aws.credentials.access-key=YOUR_ACCESS_KEY
cloud.aws.credentials.secret-key=YOUR_SECRET_KEY
cloud.aws.region.static=AWS_REGION
To generate an access key and secret key in AWS, you can follow these steps:
- Using the AWS Management Console:
- Sign in to the AWS Management Console.
- Open the IAM console.
- In the navigation pane, choose “Users”.
- Choose the name of the user whose access key you want to create.
- On the “Security credentials” tab, under “Access keys”, choose “Create access key”.
- To view the new access key pair, choose “Show”. You will not have access to the secret key again after this dialog box closes. Your credentials will look something like this:
- Access key ID: ##########NN7EXAMPLE
- Secret access key: ##########EMI/K7MDENG/bPxRfiCYzEXAMPLEKEY
- To download the key pair, choose “Download .csv file”. Store the file in a secure location.
- Using the AWS Command Line Interface (CLI):
- You can use the
create-access-keycommand to create a new Amazon Web Services secret access key and corresponding Amazon Web Services access key ID for the specified user. The default status for new keys is “Active”.
- You can use the
It’s important to securely store your secret access keys, as they are critical for accessing your AWS resources. If you lose the secret access key, it cannot be retrieved, and you will need to create a new access key.
Configure AWS Credentials
Create a package named “com.slightinsight.assist.config” and add the class “AWSConfig.java“.
AWSConfig.java
package com.slightinsight.assist.config;

import org.springframework.beans.factory.annotation.Value;
import org.springframework.context.annotation.Bean;
import org.springframework.context.annotation.Configuration;

import software.amazon.awssdk.auth.credentials.AwsBasicCredentials;
import software.amazon.awssdk.auth.credentials.AwsCredentialsProvider;
import software.amazon.awssdk.auth.credentials.StaticCredentialsProvider;
import software.amazon.awssdk.regions.Region;
import software.amazon.awssdk.services.bedrockruntime.BedrockRuntimeClient;

@Configuration
public class AWSConfig {

    @Value("${cloud.aws.credentials.access-key}")
    private String accessKey;
    @Value("${cloud.aws.credentials.secret-key}")
    private String secretKey;
    @Value("${cloud.aws.region.static}")
    private String region;

    public AwsCredentialsProvider awsCredentialsProvider() {
        AwsCredentialsProvider awsCredentialsProvider = StaticCredentialsProvider.create(
                AwsBasicCredentials.create(accessKey, secretKey));
        return awsCredentialsProvider;
    }

    @Bean
    public BedrockRuntimeClient bedrockClient() {

        return BedrockRuntimeClient.builder()
                .region(Region.of(region))
                .credentialsProvider(awsCredentialsProvider())
                .build();
    }
}
Create Required Models
Create a package named “com.slightinsight.assist.model” and add the class “Prompt.java“.
Prompt.java
package com.slightinsight.assist.model;

public class Prompt {
    private String question;

    public Prompt() {
    }

    public Prompt(String question) {
        this.question = question;
    }

    public String getQuestion() {
        return question;
    }

    public void setQuestion(String question) {
        this.question = question;
    }
}
Create a Spring Service
Create an Service class with name “AssistantService.java” under package “com.slightinsight.assist.service” that encapsulates the logic for invoking the AWS Bedrock APIs. This class should include methods for invoking foundational model API’s for generating the text for a given prompt.
AssistantService.java
package com.slightinsight.assist.service;

import java.util.List;

import org.json.JSONObject;
import org.springframework.beans.factory.annotation.Autowired;
import org.springframework.stereotype.Service;

import com.slightinsight.assist.model.Prompt;

import software.amazon.awssdk.core.SdkBytes;
import software.amazon.awssdk.services.bedrockruntime.BedrockRuntimeClient;
import software.amazon.awssdk.services.bedrockruntime.model.InvokeModelRequest;
import software.amazon.awssdk.services.bedrockruntime.model.InvokeModelResponse;

@Service
public class AssistantService {

    private static final String CLAUDE = "anthropic.claude-v2";

    @Autowired
    private BedrockRuntimeClient bedrockClient;

    public String askAssistant(Prompt prompt) {
        // Claude requires you to enclose the prompt as follows:
        String enclosedPrompt = "Human: " + prompt.getQuestion() + "\n\nAssistant:";

        return syncResponse(enclosedPrompt);
    }

    /*
     * * Synchronous call to AI for text response
     */
    private String syncResponse(String enclosedPrompt) {

        String payload = new JSONObject().put("prompt", enclosedPrompt)
                .put("max_tokens_to_sample", 200)
                .put("temperature", 0.5)
                .put("stop_sequences", List.of("\n\nHuman:")).toString();

        InvokeModelRequest request = InvokeModelRequest.builder().body(SdkBytes.fromUtf8String(payload))
                .modelId(CLAUDE)
                .contentType("application/json")
                .accept("application/json").build();

        InvokeModelResponse response = bedrockClient.invokeModel(request);

        JSONObject responseBody = new JSONObject(response.body().asUtf8String());

        String generatedText = responseBody.getString("completion");

        System.out.println("Generated text: " + generatedText);

        return generatedText;
    }
}
Create a Spring REST Controller
Create a REST controller with name “AssistantController.java” under package “com.slightinsight.assist.web” in your Spring Boot application to expose an endpoint for sending emails.
AssistantController.java
package com.slightinsight.assist.web;

import org.springframework.beans.factory.annotation.Autowired;
import org.springframework.http.HttpStatus;
import org.springframework.http.ResponseEntity;
import org.springframework.web.bind.annotation.GetMapping;
import org.springframework.web.bind.annotation.RequestBody;
import org.springframework.web.bind.annotation.RequestMapping;
import org.springframework.web.bind.annotation.RestController;

import com.slightinsight.assist.model.Prompt;
import com.slightinsight.assist.service.AssistantService;

@RestController
@RequestMapping("/api/assist")
public class AssistantController {

    @Autowired
    private AssistantService assistantService;

    @GetMapping(value = "/public/ask")
    public ResponseEntity<String> askAssistant(@RequestBody Prompt prompt) {

        String response = assistantService.askAssistant(prompt);

        return new ResponseEntity<String>(response, HttpStatus.OK);
    }

}
Anthropic Claude API : Test Run
We can run this app by issuing below command:
Command
mvn spring-boot:run
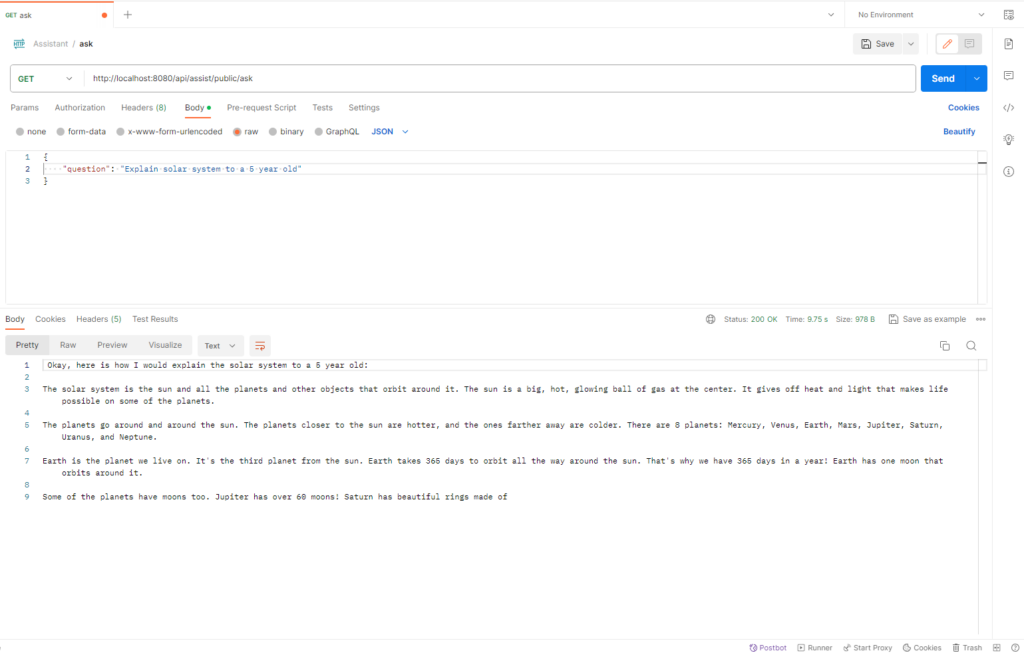
Once the app is running, try generating text by using below API endpoint url:
URL & Request Body
http://localhost:8080/api/assist/public/ask

Request Body:
{
    "question": "Explain solar system to a 5 year old"
}
If everything goes well, we will receive the response as below in postman:
Upgrade to Asynchronous Streaming Response
Its not a good user experience to keep user waiting for response. Let’s update the code to provide the streaming response, so that the user can see the text as its getting generate.
Update class “AWSConfig.java“ to create instance of .
AWSConfig.java
package com.slightinsight.assist.config;

import org.springframework.beans.factory.annotation.Value;
import org.springframework.context.annotation.Bean;
import org.springframework.context.annotation.Configuration;

import software.amazon.awssdk.auth.credentials.AwsBasicCredentials;
import software.amazon.awssdk.auth.credentials.AwsCredentialsProvider;
import software.amazon.awssdk.auth.credentials.StaticCredentialsProvider;
import software.amazon.awssdk.regions.Region;
import software.amazon.awssdk.services.bedrockruntime.BedrockRuntimeClient;
import software.amazon.awssdk.services.bedrockruntime.BedrockRuntimeAsyncClient;

@Configuration
public class AWSConfig {

    @Value("${cloud.aws.credentials.access-key}")
    private String accessKey;
    @Value("${cloud.aws.credentials.secret-key}")
    private String secretKey;
    @Value("${cloud.aws.region.static}")
    private String region;

    public AwsCredentialsProvider awsCredentialsProvider() {
        AwsCredentialsProvider awsCredentialsProvider = StaticCredentialsProvider.create(
                AwsBasicCredentials.create(accessKey, secretKey));
        return awsCredentialsProvider;
    }

    @Bean
    public BedrockRuntimeClient bedrockClient() {

        return BedrockRuntimeClient.builder()
                .region(Region.of(region))
                .credentialsProvider(awsCredentialsProvider())
                .build();
    }

    @Bean
    public BedrockRuntimeAsyncClient bedrockAsyncClient() {

        return BedrockRuntimeAsyncClient.builder()
                .region(Region.of(region))
                .credentialsProvider(awsCredentialsProvider())
                .build();
    }
}
Update Prompt.java to add another variable for choosing the response type.
Prompt.java
package com.slightinsight.assist.model;

public class Prompt {
    private String question;
    private String responseType;

    public Prompt() {
    }

    public Prompt(String question) {
        this.question = question;
    }

    public String getQuestion() {
        return question;
    }

    public void setQuestion(String question) {
        this.question = question;
    }

    public String getResponseType() {
        return responseType;
    }

    public void setResponseType(String responseType) {
        this.responseType = responseType;
    }
}
Update AssistantService.java to add function for getting streaming response.
AssistantService.java
package com.slightinsight.assist.service;

import java.util.List;
import java.util.concurrent.atomic.AtomicReference;

import org.json.JSONObject;
import org.springframework.beans.factory.annotation.Autowired;
import org.springframework.stereotype.Service;

import com.slightinsight.assist.model.Prompt;

import software.amazon.awssdk.core.SdkBytes;
import software.amazon.awssdk.services.bedrockruntime.BedrockRuntimeAsyncClient;
import software.amazon.awssdk.services.bedrockruntime.BedrockRuntimeClient;
import software.amazon.awssdk.services.bedrockruntime.model.InvokeModelRequest;
import software.amazon.awssdk.services.bedrockruntime.model.InvokeModelResponse;
import software.amazon.awssdk.services.bedrockruntime.model.InvokeModelWithResponseStreamRequest;
import software.amazon.awssdk.services.bedrockruntime.model.InvokeModelWithResponseStreamResponseHandler;

@Service
public class AssistantService {

    private static final String CLAUDE = "anthropic.claude-v2";

    @Autowired
    private BedrockRuntimeClient bedrockClient;

    @Autowired
    private BedrockRuntimeAsyncClient bedrockAsyncClient;

    public String askAssistant(Prompt prompt) {
        String response = "";

        // Claude requires you to enclose the prompt as follows:
        String enclosedPrompt = "Human: " + prompt.getQuestion() + "\n\nAssistant:";

        if (prompt.getResponseType().equals("SYNC"))
            response = syncResponse(enclosedPrompt);
        else if (prompt.getResponseType().equals("ASYNC"))
            response = asyncResponse(enclosedPrompt);

        return response;
    }

    /*
     * * Synchronous call to AI for text response
     */
    private String syncResponse(String enclosedPrompt) {

        String payload = new JSONObject().put("prompt", enclosedPrompt)
                .put("max_tokens_to_sample", 200)
                .put("temperature", 0.5)
                .put("stop_sequences", List.of("\n\nHuman:")).toString();

        InvokeModelRequest request = InvokeModelRequest.builder().body(SdkBytes.fromUtf8String(payload))
                .modelId(CLAUDE)
                .contentType("application/json")
                .accept("application/json").build();

        InvokeModelResponse response = bedrockClient.invokeModel(request);

        JSONObject responseBody = new JSONObject(response.body().asUtf8String());

        String generatedText = responseBody.getString("completion");

        System.out.println("Generated text: " + generatedText);

        return generatedText;
    }

    /*
     * * Streaming call to AI for text response
     */
    private String asyncResponse(String enclosedPrompt) {
        var finalCompletion = new AtomicReference<>("");
        var silent = false;

        var payload = new JSONObject().put("prompt", enclosedPrompt).put("temperature", 0.8)
                .put("max_tokens_to_sample", 300).toString();

        var request = InvokeModelWithResponseStreamRequest.builder().body(SdkBytes.fromUtf8String(payload))
                .modelId(CLAUDE).contentType("application/json").accept("application/json").build();

        var visitor = InvokeModelWithResponseStreamResponseHandler.Visitor.builder().onChunk(chunk -> {
            var json = new JSONObject(chunk.bytes().asUtf8String());
            var completion = json.getString("completion");
            finalCompletion.set(finalCompletion.get() + completion);
            if (!silent) {
                System.out.print(completion);
            }
        }).build();

        var handler = InvokeModelWithResponseStreamResponseHandler.builder()
                .onEventStream(stream -> stream.subscribe(event -> event.accept(visitor))).onComplete(() -> {
                }).onError(e -> System.out.println("\n\nError: " + e.getMessage())).build();

        bedrockAsyncClient.invokeModelWithResponseStream(request, handler).join();

        return finalCompletion.get();
    }
}
Update the request body to add responseType value and see the magic of text getting printed in the console as it generates.
URL & Request Body
http://localhost:8080/api/assist/public/ask

{
    "question": "Explain solar system to a 5 year old",
    "responseType": "ASYNC"
}
Git Code: AssistantAI
Conclusion
Integrating Bedrock API with a Spring Boot project empowers developers to leverage advanced AI capabilities seamlessly. This example serves as a foundational guide, demonstrating the process from project initialization to code implementation. As you delve deeper, you can explore additional features and customize the integration to suit your specific application needs.
In the next article we will use Amazon Titan foundational model to generate the vector embeddings.


Leave a Reply
You must be logged in to post a comment.